To confirm your identity when logging in to Office 365 applications, we strongly recommend the use of Passkeys via the Microsoft Authenticator App.
Multi-Factor Authentication (MFA) is another level of protection to your account on top of your password. This can be through a Passkey via the Microsoft Authenticator App, a notification sent to a device (typically a smartphone via an App), SMS or receiving a phone call. Imperial uses MFA when you log in to services such as Office 365, Panopto, Blackboard and Zscaler.
Why use MFA?
MFA adds an extra layer of protection to your account. This means if your account is compromised and your details are shared, it will be even more difficult to gain access to the account. This protects your and the university's data.
Configuring MFA
After MFA has been enabled on your account, you will need to configure the options that best suit you the first time you log in to Office 365.
You can set up notifications via the following methods below - we recommend the use of Passkeys.
Configure MFA
- Passkeys using the Authenticator App (recommended method)
- Authenticator App using number matching
- Authenticating using Security Keys (hardware device/fido2 security tokens)
In order to use passkeys on the Microsoft Authenticator App, your device will need to be running at least Android 14 or iOS 17. You will also need to have the latest version of the Authenticator app installed.
Setting up authenticator with a Passkey
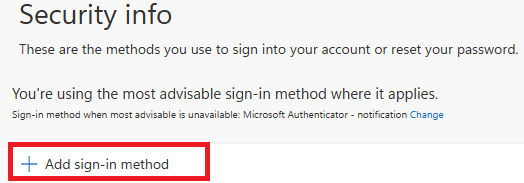
- On your device, go to your MySign-Ins Microsoft account page.
- Click + Add sign-in method.
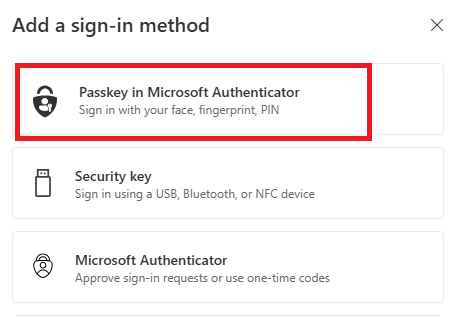
3. Select Passkey in Microsoft Authenticator.
4. On your phone, open the Authenticator app. If you’re asked for an unlock code, that’s either your phone's PIN, your fingerprint or face ID, depending on how you normally unlock your phone.
5. Select your account.
6. Select Create a Passkey.

7. You will be prompted to confirm your identity with either your fingerprint, PIN or Face ID.
8. Select done.
Authenticating with a passkey
If this is your first time using a passkey to authenticate, your account will default to your existing authentication method e.g. Authenticator App with Number Matching. If this happens, please follow the instructions below.
If you have done it before, please simply select continue/approve to complete the authentication request.
When you log in, you will be prompted to do so using your passkey. Select continue/approve.
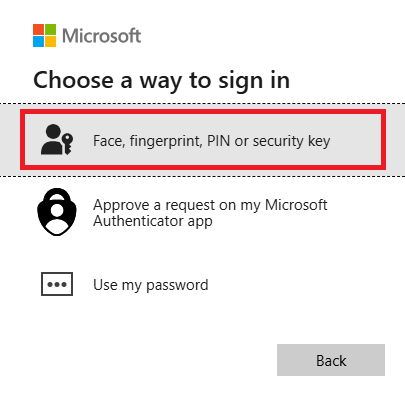
- Select other ways to sign in.
- Select Face, fingerprint, PIN or security key or Use another device.
- Select iPhone, iPad or Android Device and click Next.
- You will be presented with a QR code.
- Open the Authenticator App and click on the QR code icon.
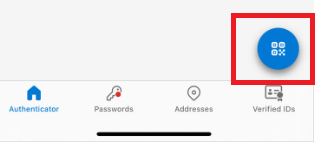
6. Scan the QR code.
7. Select Continue twice.
Setting up authenticate using number matching
- On your phone, visit the App Store (iPhone) or Play Store (Android) to download and install the Microsoft Authenticator app. Ensure that you allow it to use your camera and send notifications when it prompts you.
- On your device, go to your MySign-Ins Microsoft account page.
- Click Add method.
- On the Add a method window, ensure Authenticator app is selected from the list, and click Add.
- On the Start by getting the app window, click Next.
- On the Set up your account window, click Next.
- On your phone, open the Authenticator app. If you’re asked for an unlock code, that’s your phone’s PIN (it may alternatively require your fingerprint or retina scan if you’ve set up either of those methods on your phone).
- Click the menu button (three dots) and then Add account.
- Click Work or school account.
- Click Scan a QR code. If the app asks for permission to use your camera, click Allow.
- The app should then open a QR code scanner. Point your camera at the QR code on your computer screen.
- Click Next on the computer.
- Click Enable phone sign-in or Approve on your phone. You may also need to unlock the app using your phone’s PIN, your fingerprint or retina scan.
- Click Next on your computer.
- Click Set default sign-in method, or Change if there’s already one set.
- On your device, go to your MySign-Ins Microsoft account page.
- Check Microsoft Authenticator is selected. If not, Click + Add sign-in method and select Microsoft Authenticator and click Add.
Authenticating using number matching
On your phone, open the Authenticator app. If you’re asked for an unlock code, that’s either your phone's PIN, your fingerprint or face ID, depending on how you normally unlock your phone.
A number will display where you are trying to access services behind a login screen. You will need to enter that number on your app as shown in the pictures below.

Setting up authenticator with a security key
You will need to already have a hardware or fido2 security token to set this up.
- On your device, go to your MySign-Ins Microsoft account page.
- Click + Add sign-in method.
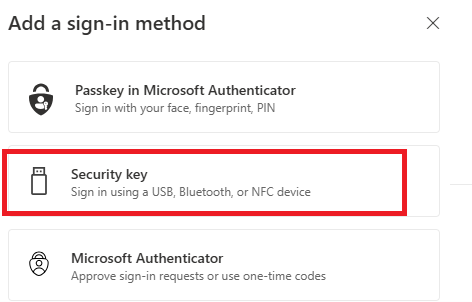
3. Select Security Key.
4. Select how you wish to setup the token via USB or NFC. Typically, either method works on a smartphone, but you would use USB on a computer.
5. Select next.
6. Select Security key and click Next.

7. Your browser will then ask permission to access your token – click Ok.
8. Your browser will then confirm that it will allow Microsoft to see the make and model of your security key, click Ok.
9. Touch your security key.
10. If you have a new device, you will be prompted to set up a pin on your key. If you already have a pin, please enter this now.
11. Touch your security key twice.
12. You will receive confirmation that your Passkey has been saved.
13. You will then be prompted to name your key. Please choose a distinguishable name as should you lose your key, you will be able to easily remove it from your account.
14. Click done.
Authenticating with a security key
If this is your first time using a security key to authenticate, your account will default to your existing authentication method e.g. Authenticator App with Number Matching. If this happens, please follow the instructions below.
If you have done it before, please simply select the pin when you set up your security key and touch it to complete the authentication request.
- Select other ways to sign in.
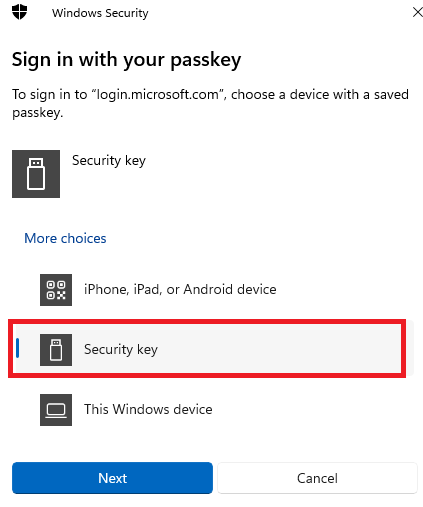
- Select Face, fingerprint, PIN or security key.
3. Select Security key and click Next.
Once this is completed, you can authenticate with your security key as normal, by entering the pin associated with your key and touching it to complete the authentication request.
Frequently asked questions
- Who can use MFA?
- Can I set up MFA in China?
- Do I have to use MFA each time I login?
- Does MFA work in my country?
- Does MFA work over Wi-Fi?
- How do I add a second multi factor method?
- I can't add MFA to my iOS mail client?
- I use my phone to check my emails, will MFA affect this?
- I'm currently abroad, will I be charged to use MFA?
- Is there an alternative to using a phone?
- I’ve received an unexpected text message or an App notification
- Preventing MFA prompts during important meetings/lectures
- What fido2/security keys does Imperial support?
- What if I change my phone?
- What if I lose my phone?
- Why am I being asked to enter a number to complete an MFA transaction?
- Why isn't location data provided by the Microsoft Authenticator App accurate?
MFA can be set up for all Imperial accounts.
Please visit the Microsoft webpage about MFA in China.
For most applications that people connect to they will have the option to trust this device for 30 days and will therefore not be constantly prompted to MFA. However, some systems require additional security and therefore will prompt every time.
The MFA service we are using is provided by Microsoft - so if Office365 (email, teams, SharePoint etc.) is available in your country, so should the authentication service. Find out more about Microsoft's availability regions.
MFA does work in China, however, there are some limitations if you are using the Android App as not all Google Services are available in China - Find out more.
Yes, the Microsoft Authenticator App works on both Wi-Fi and mobile connections.
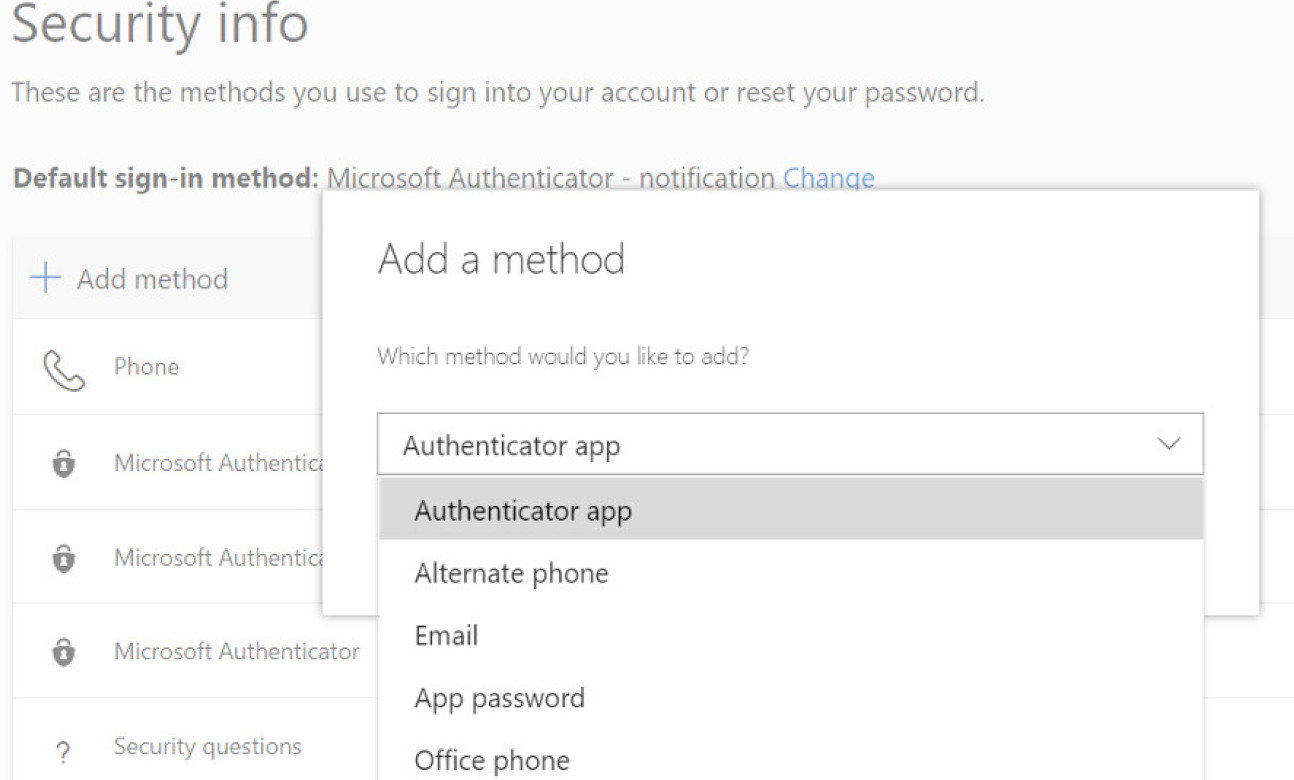
- Please go to Microsoft Sign-ins security page
- Select "Add method" at the top of the options box.
- You can then choose from a selection of methods.
- see screen shot below for guidance:
Please delete your existing Imperial College account from you iOS mail client and start again.
Most email applications provide support for MFA so users will be prompted to MFA every 30 days.
Linux users: Thunderbird v78 or higher supports MFA.
Apple users: iOS 11, iPadOS 13.1 and macOS 10.14 and above native mail client supports MFA.
We advise everyone to use Passkeys within the Microsoft Authenticator App. You may be charged to use mobile data whilst roaming – please check with your provider.
If roaming data charges apply, you can use one of the rotating passwords within the application to verify yourself. There will be no charge associated with this.
You can complete our hardware token request form if you wish to use one.
Alternatively, if you already own a fido2/security key, you can follow the instructions above to set up a security key.
Please decline the app notification (select "No It's Not Me)/do not respond to the text message and contact the ICT Service Desk who can investigate further.
Using the Microsoft Authenticator App makes dealing with MFA prompts quick and simple there may be times when you do not want the disruption of the MFA prompt. You can force the MFA prompt early on the device by following the below instructions:
Go to My Sign-Ins
It will either prompt you to re-authenticate using MFA or not, make sure you tick the "do not prompt for x days" box
If not then near the bottom click on Sign out everywhere then go to My Sign-Ins (microsoft.com) https://mysignins.microsoft.com/security-info again and it should prompt you for MFA. make sure you tick the "do not prompt for x days" box
The following fido2/security keys are supported:
- Yubikey 5 Series security keys running firmware version 5.7
- Yubikey 5 Series nano series of security keys running firmware version 5.4
- Yubikey Security Key series security keys firmware version 5.7
Please note attestation is required.
If you would like another model to be supported, please log a request for ICT to consider.
If you get a new phone then you will need to migrate the Authenticator App to your new device.
Please visit the Microsoft My Sign-ins account page and delete the device you have lost.
If you no longer have access to your account, please contact the ICT Service Desk.
We recommend setting up a second device where possible, so you can continue to access your account even if you lose your phone, hardware token or security key.
The use of MFA has drastically reduced the number of compromised accounts within the College, however malicious actors have adapted and are now using a new attack (MFA fatigue), which means individuals could repeatedly receive approval notifications.
Unfortunately, sometimes people believe that this is a system error/issue so approve the request which grants a third-party access to their account. Number matching helps to defend against this type of attack.
The location data from the app isn't always accurate, particularly if you are using a mobile network or using a Virtual Private Network (VPN).
If you are ever in doubt, based on the location provided, please select the "No It's Not Me" button and contact the ICT Service Desk.