


Create content

Creating Content Areas and Content Items
There are multiple ways to structure and curate your content in Blackboard courses. For advice on how best to layout your course we recommend contacting your Faculty Ed-Tech Lab. The help guides below are the most common ways you are likely to interact with Blackboard content areas, items and tools. Help on how to use all tools and features in Blackobard can be found in Blackboard's Support Center.
Bb tools
Blackboard Content Tools
- Using the Course Menu
- Creating Content Items
- Editing and Managing Content
- Student Preview Mode
- Add a course banner image
Integrated Content Tools
3rd Party Tools & Other Integrations
Scorm Content Items
A Scorm (Shareable Content Object Reference Model) defines a specific way of constructing course content so it can be shared with other Scorm compliant systems. It enables you to package your content and share it with other systems, ensuring the same user experience across different platforms.
A Scorm package will be developed externally to Blackboard (using a programme such as Articulate) and then compiled and compressed into a single file. These are then deployed within a course in Blackboard for students to participate in. When selecting the Scorm package, it will be opened in a separate window.
As Scorm content is often provided by a third-party developer, it is important to ensure that the package is compatible with Blackboard when compiled. If not, it may not function correctly in Blackboard. A common issue found is that the Scorm package does not communicate to the Blackboard grade centre when elements have been completed.
See the Blackboard website and the Articulate website for help and guidance on developing and deploying Scorm packages in Blackboard.
Note: ICT cannot provide support with issues in the design of individual Scorm packages; this should be provided by the vendor or developer of the product.
Video from Panopto
Panopto content can be added to a Blackboard course, allowing you to structure learning resources around your Panopto content. You can embed an entire Folder or individual Recordings.
To embed Panopto content in Blackboard, carry out the following steps:
- Go to imperial.cloud.panopto.eu and log in
- Locate either the Folder or the Recording that you want to embed
- Select the Settings cog icon for either the Folder or the Recording.
- Under the Share tab, you will see the Viewer link is pre-selected. This links directly to the recording in Panopto.
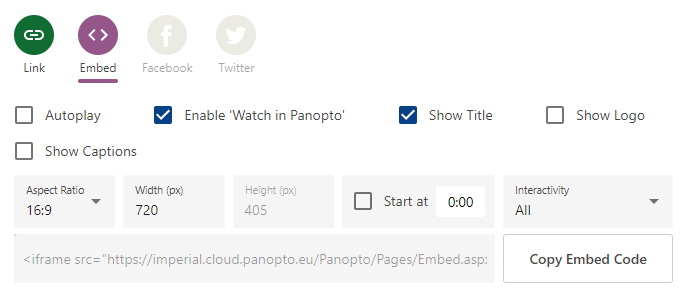
- Select Embed. This will display the embed code needed to add the folder or recording to the Blackboard course. Select Copy Embed Code. if required, you should change optional display settings, such as aspect ratio, before copying the code.
- Go to bb.imperial.ac.uk and log in to Blackboard.
- Navigate to the course that you would like to display the Panopto content.
- Create an Item within a Content Area.
- When setting up the Item, select the Source Code <> button in the text editor.
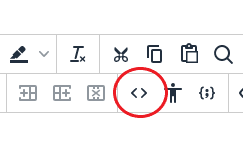
- Paste the Panopto embed code into the popup window and select Save.
- Make any additional changes to the Item and select Submit. The item will now be at the bottom of the content area and display the linked Panopto content.
When changes are made to the Folder (add new recordings, delete recordings, edit recordings etc.) these will be reflected in Blackboard and will enable students to view the most up to date content.
Note: It is important to ensure that the sharing permissions on the Panopto content allow for students on the corresponding Blackboard course to view the content. For curriculum modules that are created through the Banner integration, this will be automatic. For more information about setting sharing permissions, see the Panopto user guide.
MATLAB Grader
MATLAB Coding Problems can be created and linked to from a Blackboard course. Once added, staff and students that are enrolled on the course are automatically granted access to the coding problem.
Features that MATLAB offers include:
- Automatic problem marking
- Real-time, contextual feedback provided for solutions
- Function or script-based problem authoring
- Multiple assessment criteria, including variables, loops and custom coded criteria
- Options for both correct/incorrect and weighted grading
- A library of reusable example problems
- Rich text, images, hyperlinks, and LaTeX equations allowed in problem descriptions
More information on the use of MATLAB can be found on the ICT software pages.
Adding a MATLAB coding problem to a Blackboard course
To add a MATLAB Coding Problem to a Blackboard course, please complete the following steps:
- Go to Blackboard, enter your College username and password and select
- Select the course that you would like to add the MATLAB problem to from the My Courses
- Navigate to the appropriate Content Area of the course and ensure that Edit Mode is switched
- Select Content and then select Build Content.
- Select MATLAB Coding Problem in the list of available content types.
- Enter a name for the problem. Enter any other information you want in the appropriate fields, including Enable evaluation if you want the student score to be returned to the Blackboard grade centre when answered.
- Click Submit.
- Selecting the new link created in the Content Area will now launch MATLAB Grader within Blackboard. From here, you can create a new coding problem or select a problem from your available collections or courses. For more details on how to create a MATLAB problem within MATLAB Grader follow the instructions on the MATLAB Grader website.
Staff Support
Please contact your Faculty Ed Tech team for information on the use of these tools for teaching, learning and assessment.
For further help and support in using MATLAB, please visit the help materials provided by the developer.
Alternatively, if you have any questions or problems relating to MATLAB Grader, please contact the ICT Service Desk.
Student Support
If you have accessibility needs that cannot be accommodated by this technology, please discuss this with your Course Leader or Departmental Contact.
Microsoft Teams Integration
The Blackboard – Microsoft Teams Integration allows staff to create Microsoft Teams meetings through Blackboard and add the joining link directly into a Blackboard course’s content area.
Please note that the Blackboard – Microsoft Teams Integration is disabled on courses by default. It can be enabled at Department level only, and not for individual courses. Departments that wish to enable the tool should raise a request via their respective Faculty Ed-Tech teams.
Once the Microsoft Teams meeting has been created and the Add to Calendar or Copy option selected, the meeting will appear in the Microsoft Teams calendar and Blackboard course calendars for all staff and students enrolled on the course.
Microsoft Teams links can only be created and deployed onto a course by users enrolled as either a Course Admin or a Course Teacher in the Blackboard course where the link will appear.
Instructions
To create a Blackboard – Microsoft Teams meeting in a course, first ensure that the department the course belongs to has opted into the integration, then carry out the following steps:
- Go to bb.imperial.ac.uk and log in to Blackboard
- Navigate to the required Blackboard course.
- Under the Course Management menu, select Course Tools and then Microsoft Teams
.png)
- The first time you use the tool, you will be presented with a ‘Blackboard Learn Authorisation’ warning, informing you that the integration will be interfacing with your Microsoft Teams account. Click Allow to enable this. You should only see this message the first time you use the tool.
- Sign in to your Microsoft Teams account.
- Select Create meeting link.
- Add the meeting title, select the date and time and select Create.
- On the Meeting created screen you must select either Add to Calendar or Copy (dependant on your browser), and then OK for the popup message that appears, for the meeting to be added to Microsoft Teams and Blackboard.
Note: If you navigate away from this page without selecting Add to Calendar or Copy the meeting will not be created.
- You will then be notified that the action was successful. You can now navigate back to the Blackboard course by clicking on the course name via the breadcrumb trail at the top left of the screen.
- The link to the Microsoft Teams meeting will be automatically added as a Blackboard web link to the first Blackboard content area in the course left-hand navigation menu (reading from top to bottom). From here, it can be moved into any other Blackboard content area using the Blackboard content move tools.
The link will only become visible to students in the Blackboard course at the time of the meeting. When students click on the meeting link in the Blackboard course, their browser will prompt them to open their Microsoft Teams application, which will launch the meeting.
Note: The link will be created to appear in the Blackboard frameset. As such, students who click the link will receive the standard message ‘The content below is outside of the Blackboard Learn environment.’ when they click the meeting link, and will be presented with an additional option to open the content in a new window. To prevent students seeing this message and having to click on the extra link, staff can edit the link to change the ‘Open in new Window’ option to Yes.
Further information on the use of Microsoft Teams for teaching and learning can be found in the ICT user guide.